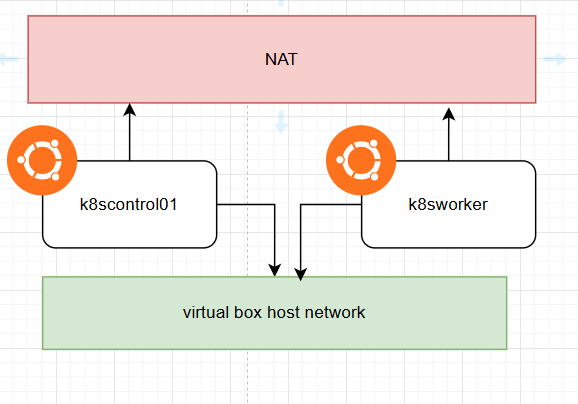
• I’m working on containerizing web/was servers to my company’s k8s environment. In order to do that, I have to configure docker files ,make docker images, save them in .tar format, scp-ing to the k8s server and import docker image to containerd. But everytime I find the modification, I need to reconfigure the docker image and follow the stressful process I mentioned.

    In order to stop doing that, I decided to configure docker private registry in my envirionment.

    docker pull image registry

    After the pulling is done, you can check the downloaded image.

    docker run -d -p 5000:5000 --name dockerregistry registry:latest

    After the creation of the container, you can see the running container by using “docker ps” command.

    docker image tag omniwebbase:v1.0.0 10.0.7.6:5000/omniwebbase:v1.0.0

    you can see the uploaded image with a tag

    what I’m trying to do is configuring registry where I can pull images pushed to the registry server seperated from k8s server. In order to do that, I will modify my containerd’s config.toml.

    config.toml file is in the /etc/containerd/config.toml path.

    you need to add the address of the registry server, If you use the http access with no tls certificate, you need to add insecure_skip_verify option with a value true.

    And also you need to modify docker’s daemon.json file. It’s in /etc/docker/daemon.json directory

    It’s for pushing images to registry server. If you don’t configure this option, you will get HTTP response error.

    docker image push 10.0.7.6:5000/<image>
    

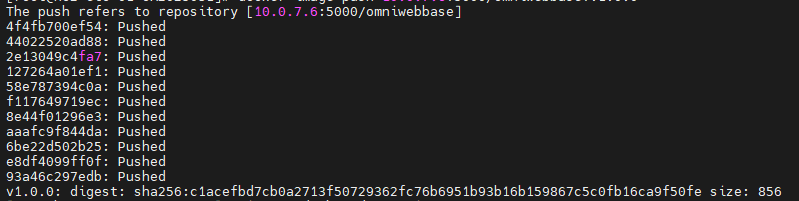
    you can see the pushing process is working fine.

    you can see if the registry is approachable by usign curl. If it’s working fine, your docker registry is ready to use.

  • In Linux there is a feature “logrotate” and cronjob. These two features are designed for different purpose but when you use them both, you can automate managing your server efficiently.

    To see if the logrotate function is working, you can use this command.

    systemctl list-timers | grep logrotate
    Thu 2025-11-06 00:00:00 KST 9h left    Wed 2025-11-05 00:00:47 KST 14h ago      logrotate.timer              logrotate.service

    You can get the result of the scheduled task.

    Before taking a look at the logrotate, Let’s take a look at the crontab. you can see the list of crontab tasks by using this command.

    # To see the available tasks
    crontab -l
    
    # To modify crontab tasks
    crontab -e

    The basic structure of the crontab task looks like this.

    * * * * * <command>
    each * has their own jobs
    *(first one) : 0-59(range/min)
    *(2nd) : 0-23(range/hour)
    *(3rd) : 1-31(range/days)
    *(4th) : 1-12(range/month)
    *(5th) : 0-7 (range/sun-sun)

    So If you want to run a task every 10 min on monday, you need to set your crontab like this.

    */10 * * * 1 <<command>>

    If you want to run a shell script with cronjob,, you can assign the file like this. It means run the scripts.sh at min 10 of every hour.

    10 * * * 1 scripts.sh

    Okay then, How should we combine these two features. Before explanation, let’s take a look at the log rotate. What’s logrotate. Let’s take a look at the configuration file first.

    vi /etc/logrotate.conf
    
    # see "man logrotate" for details
    
    # global options do not affect preceding include directives
    
    # rotate log files weekly
    weekly
    
    # use the adm group by default, since this is the owning group
    # of /var/log/syslog.
    su root adm
    
    # keep 4 weeks worth of backlogs
    rotate 4
    
    # create new (empty) log files after rotating old ones
    create
    
    # use date as a suffix of the rotated file
    #dateext
    
    # uncomment this if you want your log files compressed
    #compress
    
    # packages drop log rotation information into this directory
    include /etc/logrotate.d
    
    # system-specific logs may also be configured here.
    

    logrotate is the feature that split the size of the log file under the path /var/log. /var/log directory is the place where important logs are stored. you can decide the duration of the backup

    <to be continued>

  • Configuring kubernetes cluster is not easy. If you proceed with original method – installing all services manually and configuring all TLS certs with old methods. That’s why we use kubeadm to create kubernetes cluster.

    I’m going to configure them with oracle virtual box and ubuntu 22.04

    The basic concept for test lab is like this. We are going to use kubernetes network connected to virtual box host network. Both nodes are going to use NAT network to communicate with internet.

    After configuring VMs, You need to configure things before installing kubeadm.

    #Disabling firewall
    sudo ufw disable
    
    # Disable swap memory
    free -h 
    swapoff -a
    sed -i '/ swap / s/^/#/' /etc/fstab
    
    # Setting timezone
    sudo timedatectl set-timezone "Asia/Seoul"
    sudo timedatectl set-ntp true
    sudo systemctl restart systemd-timesyncd.service
    
    # configuring modprobe overlay, br_netfilter
    # loading overlay, br_netfilter kernel modules
    # overlay module is used for container filesystem overlay
    # br_netfilter is the module for filtering bridge network, which filters and send network packets between host and virtual network interfaces.
    
    cat <<EOF | sudo tee /etc/modules-load.d/k8s.conf
    overlay
    br_netfilter
    EOF
    
    sudo modprobe overlay
    sudo modprobe br_netfilter
    
    # Enable iptables kernel
    # net-bridge.bridge-nf-call-iptables let iptables to handle bridge traffic
    # net.ipv4.ip_forward enables ip packet transfer
    cat <<EOF | sudo tee /etc/sysctl.d/k8s.conf
    net.bridge.bridge-nf-call-iptables  = 1
    net.bridge.bridge-nf-call-ip6tables = 1
    net.ipv4.ip_forward                 = 1
    EOF
    
    # apply sysctl parameter without restarting
    sudo sysctl --system


    So these are the requirements for preparing kubernetes cluster.

    <to be continued>

  • From today, I’m going to start a side project for creating full stack web app. I’m going to make a web page with html, nginx and GO with CRUD function. And I will containerize the completed webapp and deploy them on the AWS EC2 instance by using Terraform IaC tool. I’m going to start configure html webpage first. This post follows the curriculum of “Certified Full Stack Developer Curriculum” from “freeCodeCamp”

    <!DOCTYPE html>
    <html>
    <head>
      <meta charset="UTF-8">
      <title>Document</title>
    </head>
    <body>
      
    </body>
    </html>
    

    This is the simple structure of the html file. there are <head> part and <body> part. you can put CSS or JS files, Type of Encoding, Name of the web site inside the <head> section. You can put articles or pictures inside the <body> section.

    <h1> </h1>
    
    <h2> </h2>
    <p> </p>
    <img />  'This is a void element'
    
    <img src="https://www.test.com/test.jp" />
    
    # By using this, you can see the alt message instead of the image. If there is something wrong with the src and image is not being displayed, content with alt will be displayed.
    <img src="https://www.test.com/test.jpg" alt="This is a test image" />
    
    # attribute is a value inside the opening tag of HTML element. 
    <element attribute="value"></element>
    
    #href specifies the URL of a link and the target specifies where to open the link. target="_blank" means to open a link in a new browser tab
    <a href="https://www.naver.com/news" target="_blank">Visit naver</a>
    
    # you can create checkbox by using this code
    <input type="checkbox" checked />
    <input type="checkbox" />
    
    # you can create text box
    <input type="text" />
    <input type="text" disabled />

    But you can’t build a complicated website with HTML only. You need to use CSS or JavaScript to do that since the HTML is only for the content and structure. You can use CSS for styling and JavaScript for adding interactivity.

    # This is the full practice from the freecodecamp
    <h1>Welcome XYZ Pet Adoption!</h1>
    <p>Consider adopting a pet today. We have cats, dogs, rabbits and more.</p>
    
    <h2>See our cats!</h2>
    <img src="https://cdn.freecodecamp.org/curriculum/cat-photo-app/cats.jpg" alt="Two tabby kittens sleeping together on a couch.">
    
    <h2>Adopt a cat!</h2>
    <a href="/cats">Visit cats page</a>
    
    <h2>Adopt a dog!</h2>
    <a href="/dogs">Visit dogs page</a>
    # link element is used to link to external stylesheets. rel attribute link the HTML and linked resource. href is to assign the URL. link element should be place inside the head element. By using preconnect, you can create an early connection to the value in href.
    favicon is the icon which is displayed in the browser tab next to the site title.
    
    <link rel="stylesheet" href="./styles.css" />
    <link rel="preconnect" href="https://fonts.googleapis.com" />
    <link rel="icon" href="favicon.ico" />

    There is a pre-defined template for HTML which is called boilerplate. Let’s take a look at the example.

    <!DOCTYPE html>
    <html lang="en">
      <head>
        <meta charset="utf-8" />
        <mete name="viewport" content="width=device-width, initial-scale=1.0" />
        <title>freeCodeCamp</title>
        <link rel="stylesheet" href="./styles.css" />
      </head>
      <body>
      </body>
    </html>

    <!DOCTYPE html> : This part tells the browsers about the version of HTML you are using.

    <!DOCTYPE html>
    <html lang="en">
      <!--All other elements go inside here-->
    </html>
    In this part you can specify the language of the page. 
    
    <!DOCTYPE html>
    <html lang="en">
      <head>
        <!--Important metadata goes here-->
      </head>
      <body>
        <!--Headings, paragraphs, images, etc. go inside here-->
      </body>
    </html>
    In this part you can see the <head></head> and <body></body> sections. Inside the head section, you can see the metae elements which contains details like character encoding. With title element, you can determine the text appears in the browser tab or window. In body section, you can see contents in it.
    
    <meta charset="UTF-8" />
    what's UTF-8 ? it is a standardized character encoding widely used on the web. It supports every character in the Unicode character set. 
    

  • I’m an enthusiastic devops engineer with VDI and sysAdmin experience. I’m going to post tech posts related with AWS, NCP(naver cloud platform in korea), CI / CD gitlab and go lang for study purpose. There can be mistakes in my posts. I would be happy if you find an error and let me know!